Ralph J. Smit Laravel Software Engineer
Have you ever wanted to give your theme users an easy option to control the typography of certain elements? Adding this sort of functionality is not available by default in the WordPress Customizer API, so you'd end up having to write some sort of custom control. Luckily, the Kirki Customizer Framework has a very handy typography control built into it. Learn how to use the Kirki typography control.
To start with Kirki, you need to have Kirki installed on a WordPress installation. I created a very handy Kirki beginners' guide, so that everybody can get started with it.

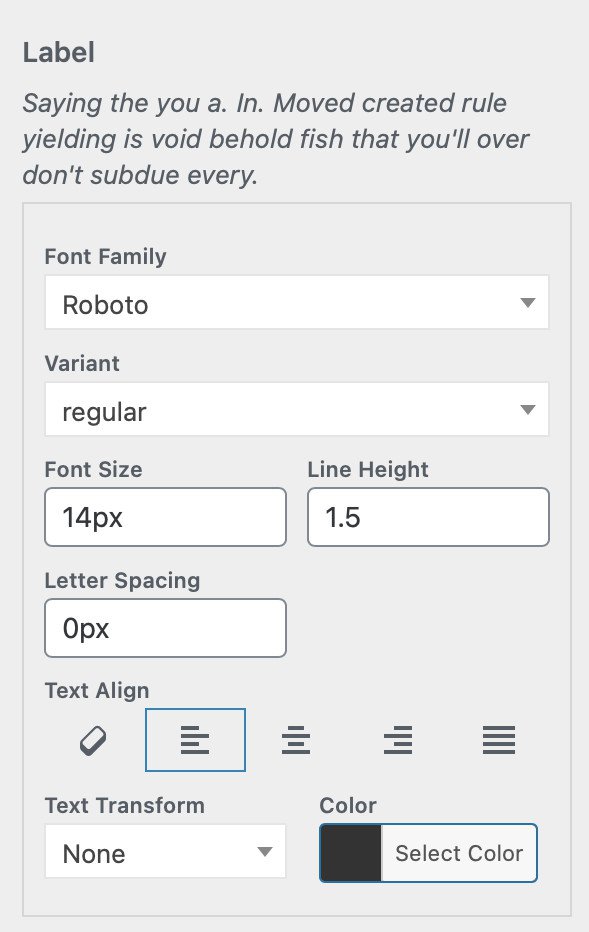
An example implementation of the full Kirki typography control.
Adding the Kirki typography control
The Kirki typography control has a similar syntax to other Kirki controls. The biggest difference is in the default parameter. Strictly speaking, the typography control is not really a single control, but more like a neatly organised group of controls that work together. This means that each control can contain multiple values (font-family, font-size, line-height, etc.).
The default 'starting point syntax' looks like this. Starting with this 'frame', you can modify it all.
Kirki::add_field( 'theme_config_id', [ 'type' => 'typography', 'settings' => 'typography_setting', 'label' => esc_html__( 'Label', 'text-domain' ), 'section' => 'section_id', 'default' => [ 'font-family' => 'Roboto', 'variant' => 'regular', 'font-size' => '14px', 'line-height' => '1.5', 'letter-spacing' => '0', 'color' => '#333333', 'text-transform' => 'none', 'text-align' => 'left', ], 'choices' => $choices, //I explain this below 'priority' => 10, 'transport' => 'auto', 'output' => [ [ 'element' => 'body', ], ],] );Where do we need to place this code?
This code can be placed in any PHP file. In most cases it is called the
Settings
The first lines are some general settings. First, you'll need your theme_config_id to register the control. If you don't know what this is, please refer to my getting started guide for Kirki for setting this up.
The parameter type specifies that this is an typography control.
The parameter settings specifies the name under which the values are saved in the database. This is the name you can use to retrieve the value with get_theme_mod(), though you'll probably not really have a use case for that here.
The parameter label is the text at the top of the control. If you want, you can add the same parameter double, only with the name of description.
The parameter section is the section to place the control.
Kirki::add_field( 'theme_config_id', [ 'type' => 'typography', 'settings' => 'typography_setting', 'label' => esc_html__( 'Label', 'text-domain' ), 'description' => esc_html__( 'Description', 'text-domain' ), 'section' => 'section_id',Define the defaults and show or hide specific fields
Next, you'll get the parameter default. This parameter has two applications:
-
Define the default values
-
Show or hide fields with settings. If you omit one of the parameters and its value, like
line-height, theline-heightfield will also not show up. You can delete every line you don't need.Note: there is one exception to this rule, which is the
font-familyand thevariantparameter. As Kirki uses Google Fonts, these two controls are needed to specify which font files to load.
'default' => [ 'font-family' => 'Roboto', 'variant' => 'regular', 'font-size' => '14px', 'line-height' => '1.5', 'letter-spacing' => '0', 'color' => '#333333', 'text-transform' => 'none', 'text-align' => 'left',],Fonts with Kirki
Now the last thing special here is the choices parameter. This parameter defines which fonts to offer as an option in the font-family field.
'choices' => $choices, //You can also add it directly.$choices = [ 'fonts' => [ 'google' => [], 'families' => [ 'custom' => [ 'text' => 'Label for your custom fonts in the control', 'children' => [ [ 'id' => 'helvetica-neue', 'text' => 'Helvetica Neue' ], [ 'id' => 'linotype-authentic', 'text' => 'Linotype Authentic' ], ], ], ], 'variants' => [ 'helvetica-neue' => array( 'regular', '900' ), 'linotype-authentic' => array( 'regular', '100', '300' ), ], ],];
It looks a little complicated, though it's not really complicated. You might want to take a good like at it, though, so to make sure that you fully understand how it works. So what do we have now?
The choices parameter is an array too (we use the new syntax here, [] rather than array(). That array contains a key (fonts) and another array as a value. That array can take three parameters:
-
The parameter
google; -
The parameter
families; -
The parameter
variants; -
The parameter
standard.
Google Fonts in the WordPress customizer with Kirki
One of the main advantages of the Kirki typography control is that it automatically loads Google Fonts. You can choose to load all Google Fonts or only a few. You generally speaking have four options:
'google' => [], //All the Google Fonts.'google' => [ 'popularity', 30 ], //The 30 most popular fonts (change to number to your liking)'google' => [ 'trending', 30 ], //The 30 most trending fonts (change to number to your liking)'google' => [ 'Roboto', 'Open Sans'], //Specific Google Fonts (define them manually)Custom fonts in the Kirki typography control
The other two parameters, families and variants, are to add custom fonts to the customizer.
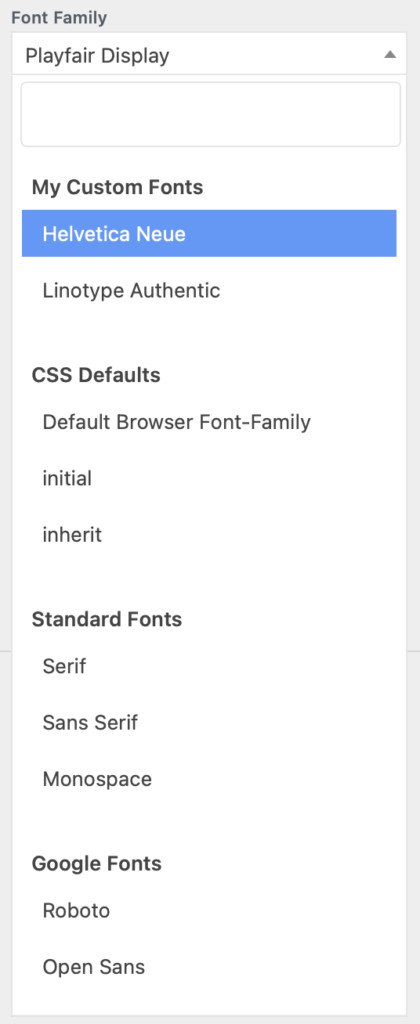
The four kinds of sections in use.
When you add custom fonts to the customizer, you'll notice that Kirki displays four kinds of sections.
-
The section with your custom fonts. You can set the label yourself.
-
CSS Defaults
-
Standard Fonts. This is a default font-stack, but you can tweak those fonts.
-
Google Fonts
So, how do we add custom fonts? To do that, we'll need to take two steps:
-
First, we register the font family. This is done with the
familiesparameter, where you can assign a name and anidfor each font family. -
Then, we'll add custom fonts variants with the
variantsparameter. Here you need to use theidspecified in thechildrenparameter.
I already gave an example and I would like to repeat it here, as it shows a simple how to add variants to the typography control. It won't get more difficult than this.
$choices = [ 'fonts' => [ 'google' => [], 'families' => [ 'custom' => [ 'text' => 'Label for your custom fonts in the control', 'children' => [ [ 'id' => 'helvetica-neue', 'text' => 'Helvetica Neue' ], [ 'id' => 'linotype-authentic', 'text' => 'Linotype Authentic' ], ], ], ], 'variants' => [ 'helvetica-neue' => array( 'regular', '900i' ), 'linotype-authentic' => array( 'regular', '100', '300' ), ], ],];Changing the standard font stack for Kirki
Then, the remaining parameter is the standard parameter. This parameter can be used to define the standard font stacks we've seen in the image above. I don't think you'll really use it, but you can tweak them like this:
'standard' => [ 'Georgia,Times,"Times New Roman",serif', 'Roboto, Oxygen-Sans, Ubuntu, Cantarell, "Helvetica Neue", sans-serif',],Priority & transport
Now that we've extensively seen how to add custom fonts and use the Kirki typography panel, we'll shortly discuss the other parameters.
The priority parameter really speaks for itself. It is used to order the controls in a section.
The transport parameter is the setting for the postMessage function. I would recommend to set this to 'auto', meaning that Kirki automatically updates the preview without reloading.
Outputting the CSS
For the Kirki typography control, you'll only need to add the CSS selector to output the parameters for. You don't need to add CSS properties, as the typography control already caters for this itself.
With this example, Kirki outputs the values on these two CSS selectors:
'output' => [ [ 'element' => 'body', ], [ 'element' => '#rjs_body h1.heading', ],],Conclusion
As you've seen, the Kirki typography control is extremely versatile and helpful when building WordPress themes. In my days when I was learning Kirki, I had a hard time figuring out how to add custom fonts to Kirki. Luckily, that's much easier now.
One thing I'm looking forward to, is the new typography control in Kirki 4.0 (or called Pro). I don't know when that 'll be released, but it seems like it's still some time off. Aristath once hinted at a new implementation for the typography control and he shared a screenshot of it, so we're eagerly awaiting the next release.
An example implementation of the full Kirki typography control.
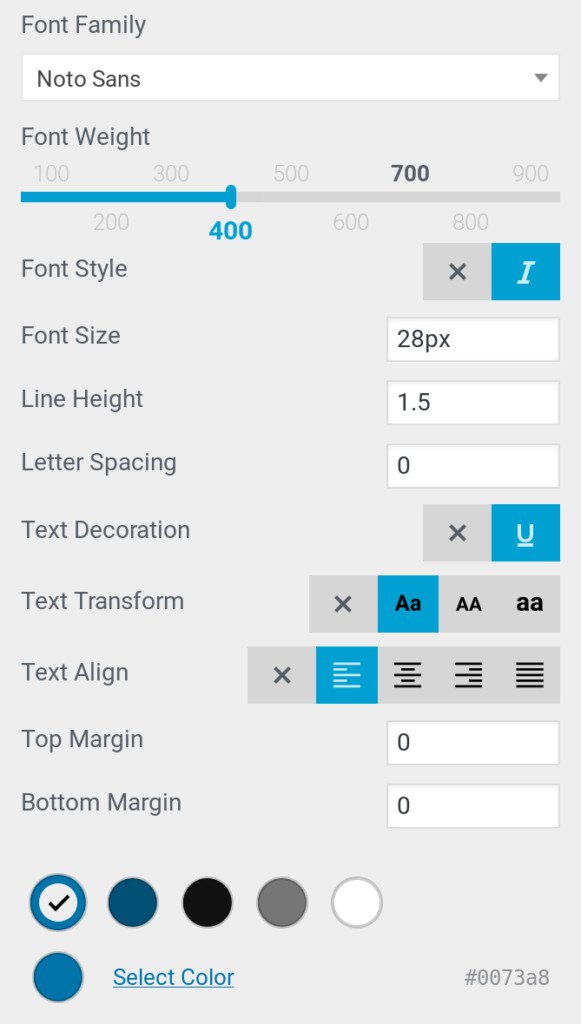
A possible implementation of the new Kirki typography control in version 4.
If you have a question or if this has been helpful, please leave a comment below!
Published by Ralph J. Smit on in Kirki . Last updated on 10 March 2022 .